Wednesday, July 30, 2014

Cardboard Roll Shuttling Rocket


What can you make with some long lengths of string/ribbon and an empty cardboard toilet paper tube? A rocket, that's what!


There are a few other necessities: two people and teamwork.

Decorating your rocket is optional. We added some craft foam fins with hot glue, but the boys were too eager to see the rocket in action to really give it an authentic look.


To prepare, cut two long lengths of string. Mine were each five to six feet long. Make a loop at each end so the string has a "handle."


Note: If you tie this with a slip knot (I think that's what it's called), the loop you've created might shrink as the string slides, so don't put these around a child's wrists. Just have them hold onto them with several of their fingers threaded through the loop. To avoid any possibility of this, grab four bangle bracelets or cut the center out of round plastic lids and tie the string to them to use them as handles.

Now put the lengths through the toilet paper tube's hole and have each child stand opposite each other with the string loops in each hand.

They'll need to stand so the string is fairly taut. Have both children start with their hands together. Move the rocket tube along the string close to one child's hands. Then instruct that child to widen his/her hands/arms and watch the rocket shuttle to the other child. Can he/she send it back?


This took some real teamwork for my boys. They had to work together to figure out whose hands should be together and whose should be opening in order to send the rocket back and forth between them.

They had a blast (pun intended)!

Check out the short video we made to show you how it works. (There is some serious concentration going on here.)


Want to pair this with a great book? Our nearly five year old and I read Roaring Rockets from Tony Mitton's  Amazing Machines series (we LOVE these picture books).


This idea came from FamilyFun magazine.


Monday, July 28, 2014

After School Linky Party (7-28)


Welcome to the After School Linky Party!


Summer is drawing to a close. If you're desperately trying to make the most out of the last days of summer, this linky has loads of ideas to help you.

Here are a few favorites from last week's link up.


Scissor School at Doodles and Jots.


The After School Linky is cohosted by
Relentlessly Fun, Deceptively Educational

We would love to have you link up your School-Age Post (Ages 5 and up) about your learning week after school including Crafts, Activities, Playtime and Adventures that you are doing to enrich your children's lives after their day at school, home school, or on the weekend!

When linking up, please take a moment to comment on at least one post linked up before yours and grab our after school button to include a link on your post or site! By linking up, you're giving permission for us to share on our After School Pinterest Board and feature an image on our After School Party in the upcoming weeks!

Friday, July 25, 2014

5 for 5: Free Printable Vertebrates Card Game


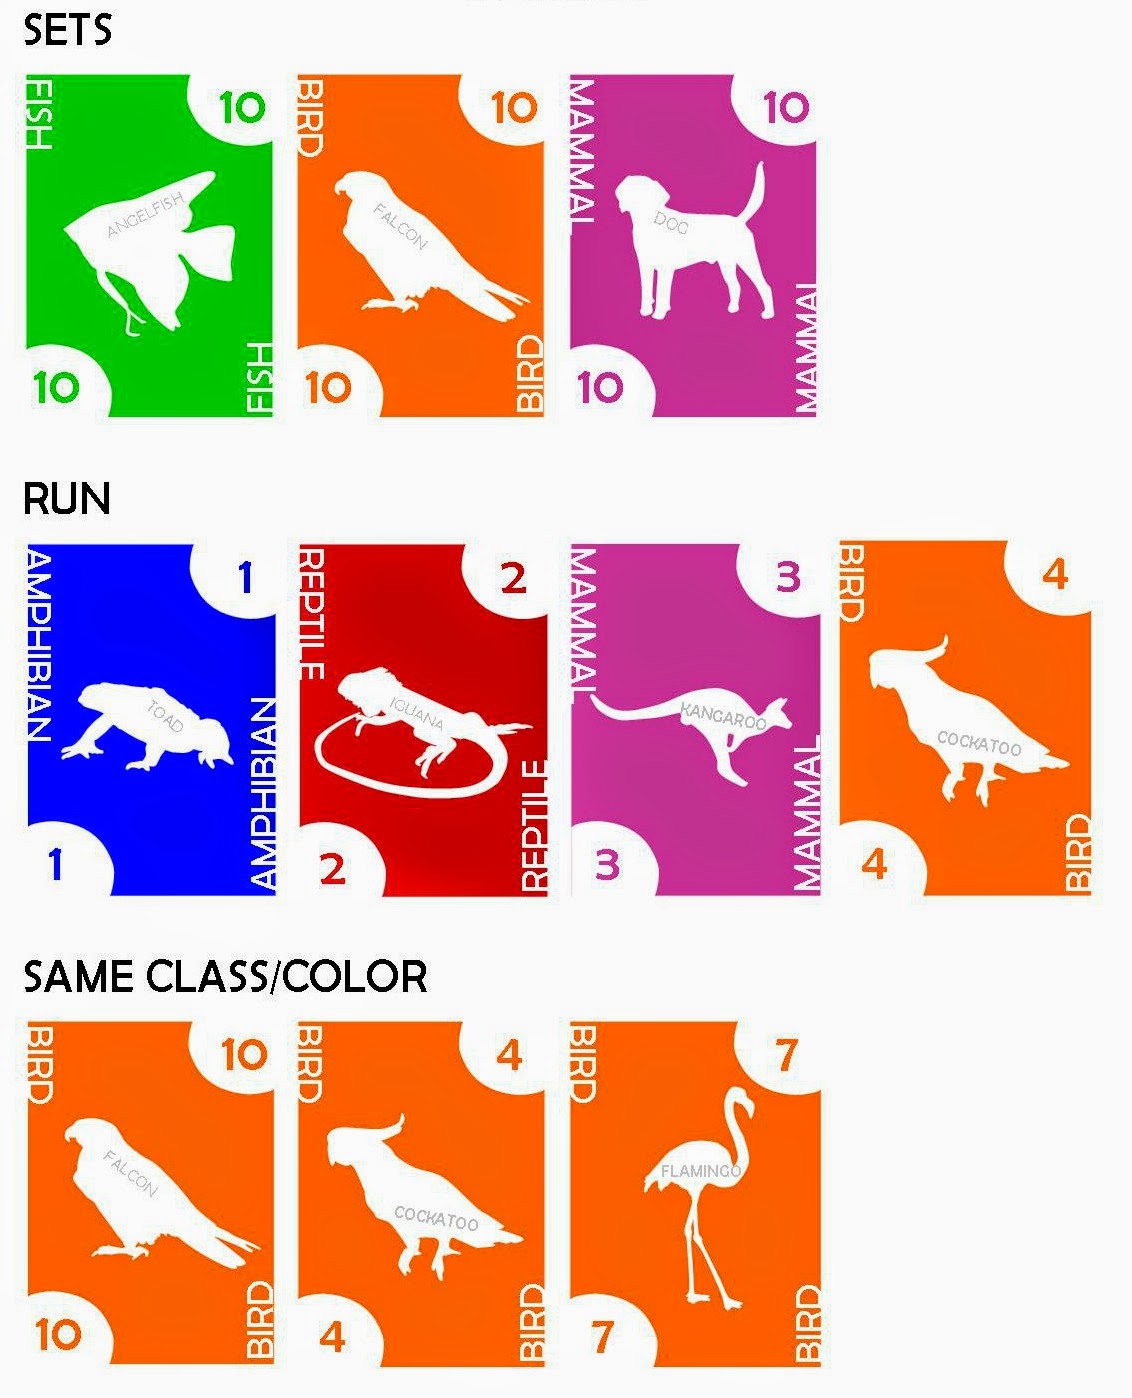
Have you ever played Phase 10? It's a rummy-type card game and it's the inspiration for this vertebrates card game that features examples from the five classes of vertebrates:
amphibians
birds
fish
mammals
reptiles


Prep
Download the free 9-page PDF from Google Drive here.
Print pages 1-8 on heavyweight white cardstock.
Print page 9 (a reference sheet) on plain office paper.
Use a paper trimmer to cut all the cards apart.
Shuffle


The Objective of the Game
Be the first player to complete all rounds of play. If all/both players complete the rounds at the same time, the player with the lowest score wins.

How to Play
Deal 10 cards to each player, who keeps their cards from opponents' view. The rest of the deck is placed in the middle of the play area and the top card is flipped over to start a discard pile.

The youngest player starts play by drawing a card either from the draw pile or the discard pile. Their turn ends when they discard one card.

Play starts with players trying to get all the cards necessary for Round 1. The rounds follow:

Round 1: 2 sets of 3
Round 2: 1 set of 3, 1 run of 4
Round 3: 7 cards of one class/color
Round 4: 1 set of 4, 1 run of 4
Round 5: 1 run of 7

Each player only makes one round per hand.

Sets are cards of all the same number. Runs are cards with consecutive numbers. And cards of one class/color are all the same type of vertebrate (e.g. all cards are reptiles).


WILD cards can be used to complete a round, in place of a missing card. For example, if a player is creating a run and has a 1, 2, and 4 card. They can use the wild card in place of a 3 card.

SKIP cards, when discarded, cause another player to lose their turn. Skip cards are never laid down as part of the round's cards.
Once a player has all the cards specified in that round, they lay them down on the table in front of them for everyone to see.  Any additional cards a player may have that go along with these cards can be added (e.g. if a player has four 3 cards, but only needs three, he/she can lay down the extra card).

The player can continue to add cards to their own displayed hand and once other players lay down their own sets/runs/all-one-color hands, opponents can play on them as well.

The goal is to get rid of all your cards, while drawing and discarding each turn.


If a player plays all their cards, opponents must tally their score based on the remaining cards in their hand.
Cards numbered 1-5 = 5 points
Cards numbered 6-10 = 10 points
Skip cards = 15 points
Wild cards = 25 points

If a player has yet to lay down all the specified cards in the round when another players goes out of cards, not only will their score be high, but the next time you shuffle and begin play again, they will need to repeat their attempt to get that round's cards again.

This means that players may be striving to make different rounds' hands.

Shuffle cards and deal 10 before each round.


Want a perfect book to go with this game? We read Animal School by Michelle Lord. It contains a description (in rhyming verse) of each of the five classes of vertebrates. It also has a great matrix toward the back of the book that identifies their characteristics (some exceptions) and species from each class. This book was the perfect complement to our activity!

Wednesday, July 23, 2014

Printable Lacing Cards: Numbers 0-10


Fine motor skills need practice and learning numbers takes practice, so voila. I made some number lacing cards for my little guy. 


You can download a PDF of these free 0-10 Lacing Cards from Google Drive here


I printed ours on heavyweight cardstock and laminated them for extra durability. Then I cut them apart and used my handy unconventional hole punch. 

To make the lacing strings, I cut lengths of yarn. I clipped toothpicks, added a dot of glue in the center and tied a knot around the middle. This prevented the yarn from being pulled through the first hole. 

At the other end of the yarn, I used clear tape to carefully and tightly wrap the end to prevent fraying and make threading the yarn through the holes a little easier.


Now all that was left to do was hand over the cards to my youngest son. I had him start each card at the star and end at the colored hole.

He concentrated so hard to weave the yarn in and out of the holes and was so proud to finish a card. I love the combination of math and fine motor practice he gets with these cards!

Enjoy!

Monday, July 21, 2014

After School Linky Party (7-21)

Welcome to the After School Linky Party!


Summer is whizzing past. Whether you're looking for ways to get kids interested in learning again, or looking for ideas now that the bucket list is empty, you've come to the right place. 

Here are a few of my favorites from last week's party.


Inventing a Bouncy Ball Machine at Inspiration Laboratories.


Number Attack at Tiny Tots Adventures.


The After School Linky is cohosted by
Relentlessly Fun, Deceptively Educational

We would love to have you link up your School-Age Post (Ages 5 and up) about your learning week after school including Crafts, Activities, Playtime and Adventures that you are doing to enrich your children's lives after their day at school, home school, or on the weekend!

When linking up, please take a moment to comment on at least one post linked up before yours and grab our after school button to include a link on your post or site! By linking up, you're giving permission for us to share on our After School Pinterest Board and feature an image on our After School Party in the upcoming weeks!

Friday, July 18, 2014

How to Make a Paper Airplane AND a Launcher


Paper airplanes have been a favorite with our oldest son for ages (check out our airplane race here). But this time, I he was REALLY psyched.

We made a launcher for our planes!


What you need
a piece of office paper
paperclip
2 rubberbands
1 wooden craft stick
hot glue

Here's how we did it.


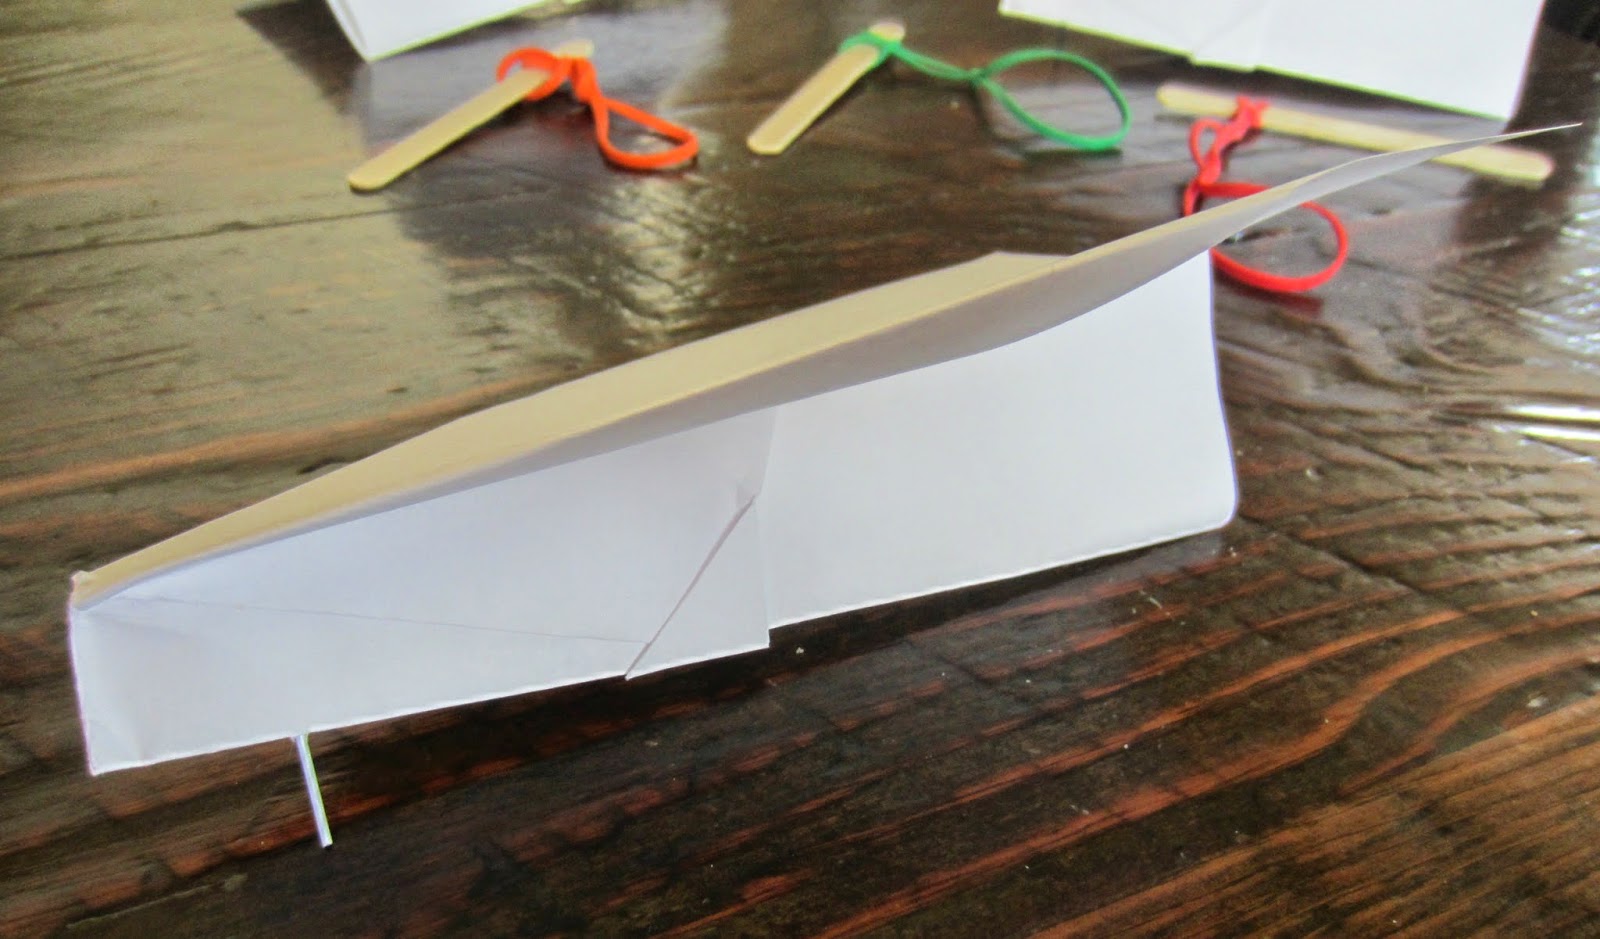
The plane
Take a piece of 8 1/2 by 11 office-weight paper and fold the long sides together (hot dog style, as my son would say), creasing in the center.

Open it back up and bring in the top corners to the center fold. Crease.

Fold over the top triangle and crease right where the flaps ended.

Bring the sides in to the center about one inch above the point.

Fold the inverted triangle, so it's tip is pointing up.

Fold it backwards on the center crease, so the folds are on the outside.

Fold each wing back, creasing them at the point where the paper goes from straight to angled.

To use the plane with a launcher, you need a paper clip.

Pull the long outside wire on the paper clip, so it forms a 90-degree angle.

Poke the point of the paperclip, through the plane about one inch back from the nose, along the center crease.

Add a dab of hot glue (parents, this is your part! That glue is H-O-T!) to secure the paperclip in place and glue the center spine of the airplane together.


The launcher
Grab two rubberbands. Thread one through the other, and pull one end through the loop that is created to attach them together.


Now grab a wooden craft stick and lay it over one end of the rubberband strands. Pull the other end through the loop that's created. Voila!

How to launch the plane
Hold one end of the wooden craft stick in your left hand. Holding the plane in your right hand, hook the paperclip on the plane through the end of the rubberband strand hanging off the craft stick. Pull back until the rubberband is stretched. Let go to launch the plane. Yee-haw!


This project came from the book Stomp Rockets, Catapults, and Kaleidoscopes: 30+ Amazing Science Projects You Can Build for Less than $1.

Wednesday, July 16, 2014

Pegboard Practice [Letters Edition]


What can you do with a piece of wood, 16 nails, and some rubberbands? Practice matching upper case and lower case letters, that's what!


I made this pegboard for our oldest son to use practicing state capitals. But with the applications for its use truly unlimited, I thought I'd give our youngest son (almost 5) a chance at it.

To learn how I made our pegboard, visit this post which contains instructions.

Download the upper and lower case letter matching pages free on Google Drive. You can access the 4-page PDF here. Print them on heavyweight cardstock.


Use a non-standard hole punch to punch the holes out. This is the one I use, along with a rubber mallet.


Simply slide the sheets over the nails and hand your child eight rubberbands, to string over the nails and along to the corresponding letter (e.g. M to m).


Beyond practicing letters, this is great work for those fine motor skills too!

Monday, July 14, 2014

After School Linky (7-14)

Welcome to the After School Linky Party!


Who says summer learning is boring? Not these bloggers!

Here are some of my favorites from last week's party.


Ant 3-Part Cards at Gift of Curiosity.


The After School Linky is cohosted by
Relentlessly Fun, Deceptively Educational

We would love to have you link up your School-Age Post (Ages 5 and up) about your learning week after school including Crafts, Activities, Playtime and Adventures that you are doing to enrich your children's lives after their day at school, home school, or on the weekend!

When linking up, please take a moment to comment on at least one post linked up before yours and grab our after school button to include a link on your post or site! By linking up, you're giving permission for us to share on our After School Pinterest Board and feature an image on our After School Party in the upcoming weeks!

Friday, July 11, 2014

Printable Alphabet Blackout Game


We’ve decided that our youngest son isn't quite ready for elementary school, so he'll be starting alternative kindergarten in the fall. (He has a late summer birthday.)

We're finally getting disciplined about helping him on letter and number recognition. I'm still trying to understand how he learns best, so I'm trying LOADS of different activities.

This is one of our most recent: Alphabet Blackout.


What you Need
Alphabet Blackout cards
Letter call cards
9 game pieces per player (we used poker chips)

Download a free PDF of six blackout cards and the letter call cards from Google Drive here.


Set Up
Cut the blackout cards apart; laminate for durability, if desired. Cut the call cards apart and shuffle.


How to Play
With the call cards shuffled, stacked, and placed face-down, one player draws the card on top and shows it to players. Children should announce what letter is featured before looking on their card to see if it's featured. If it is, they cover one game piece on top of the letter. Play continues like this until all nine letters on one players card are covered. The first player to get "blackout" wins!


I'd originally planned to only play until a player had three game pieces in a row, but my son's attention span was longer than expected and he wanted to keep playing! Our oldest son agreed; this was a better blackout game!

Wednesday, July 9, 2014

Race Around the Clock Game


My almost nine year old son is great at time telling, probably better than I am at 38 years old. But I knew he'd have fun with this game.


It's simple and great practice telling time, counting, adding minutes, moving the hour and minute hands practice, etc.

What you Need
A clock for each player with movable hands 
A deck of playing cards (My son chose Star Wars Villain playing cards.)


Don't have a clock? Don't worry! Print mine free from Google Drive here and use a brad to attach the hands.

Objective
Beat your opponent around the clock first.

How to Play
Shuffle the cards and make sure each clock is set to 12:00.

Before you begin, decide if players will move the hands one hour or multiple hours. Playing the game to see who can move the hands from 12:00 to 4:00 first, enables players to move both the hour and minute hands more often, whereas moving the clock from 12:00 to 1:00 means they only move the hour hand once. You decide, based on attention span, as well as your child's attention span and proficiency.

The youngest player starts first and draws a card off the deck. The number on the card tells the player how many minutes to move their clock. Draw a 6, and the player moves their hand to 12:06, and announces their new time.

The next player does the same, drawing and moving the hands on their own clock.

If a player draws the following face cards, they earn the designated times.

Jack = 15 minutes
Queen = 20 minutes
King = 25 minutes
Ace = lose 30 minutes
Joker = lose a turn

If you've just started the game and a player draws an Ace (e.g. they have not moved past 12:30), they must move back to 12:00. Or if they have moved past 12:30, they must move back the full 30 minutes.


This game is incredibly simple and yet fun too. I hope you enjoy it as much as my son and I did!